
While PVC toilet flanges are commonly used in modern houses, you will find cast iron toilet flanges in most old houses. This material is pretty durable and sturdy, giving you many years of continued functioning without disintegrating or cracking, although it will cost you more than the others.
If your cast iron toilet flange is too high then you will need to lower it and there are three ways hammering, build up the floor or replace the toilet flange all together.
We have discussed in depth below how to fix to prevent issues like fluid and leaking sewer gases.
What If My Toilet Flange is Too High?
Like other closet flanges, a cast iron toilet flange should be 1/4 inches above your finished floor to ensure you can achieve a watertight seal with nearly any wax ring. The height of the flange needs to be the first thing you confirm when getting ready to install your toilet.
You’ll be able to measure your toilet flange’s height once you set the toilet aside. It can be quite frustrating to find that your cast iron toilet flange is too high, but luckily, you can correct the issue, as you’ll see below.
How to Lower A Cast Toilet Flange That’s Too High
However, resizing a toilet flange requires the right tools and techniques, depending on the plumbing setup and flange material. Do the following to fix a cast iron flange that’s too high, making sure the toilet sits steadily without wobbling.
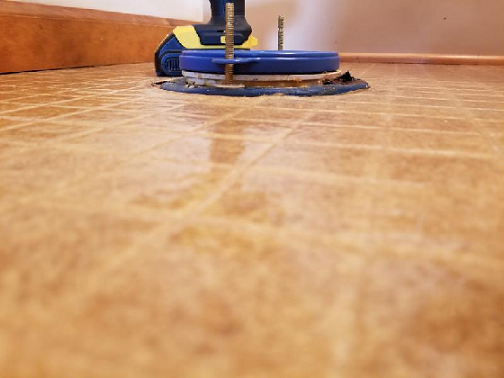
1. Hammering
You can attempt to lower your cast iron toilet flange by hammering, reducing its height to the recommended 1/4 inches above your completed flooring. Do the following to complete this task successfully.
- Hold a 2×4 block against the drain pipe wall, then tap it lightly but firmly around the pipe with a hammer. Make sure you direct the greatest force on the flange’s inside part to the wall of the pipe. Refrain from hammering too hard and tapping the outer part adjacent to the slots because of the cast iron’s brittle nature.
- Slowly continue tapping, going around the toilet flange until it’s against the floor level.
- Recaulk the lead connection with the outside and inside caulking irons because the lead seal is already loosened.
- A few inches of cast iron pipe will be exposed, so use small bites and a crescent joint to nibble the pipe to the lead joint.
- Take down the pipe gradually until you can reset the toilet if the lead joint you recaulked is tight.
- If the above steps do not work, grind the cast iron flange or cut it off using an angle grinder.
Read Also 3 ways to fix Toilet Flange 1/2 above floor
2. Floor Build-Up
While lowering your cast iron toilet flange, as shown above, is an effective method of reducing its height, it’s costly and time-consuming. Therefore, you can opt for a more straightforward solution- constructing a subfloor to minimize the distance between the finished floor and the flange top.
You can use a cement board or plywood for this job.
Floor Build-up With A Cement Board
Follow the procedure below to correct a cast iron toilet flange that’s too high.
- Fill The Gap
A cement backer board with tile on top is ideal if the distance between the flange’s outer circle and the subfloor is approximately 3/4 inches. The best thing about using backer boards is not worrying about swelling since they are stable dimensionally.
It’s vital to note that swelling makes tiles crack, something you don’t want happening because it will force you to replace them. The replacement will cost you time and money.
- Measure The Floor Area
Here, you’ll need to determine the floor area you will require to build the subfloor to help you identify how many backer board pieces you require.
- Measure The Toilet Flange Radius
By determining your toilet flange’s radius, you can make the backer boards circular shaped. Put four backer board pieces to create a larger square, draw a circle at the bigger square’s center, then add 1/2-inch to the circle measurement.
Cut the circle, break the larger square, and then snug your backer board around the flange.
- Spread Mortar Allover The Floor Area Needed To Build-Up
Spread mortar evenly throughout the area where the boards will go, then place the boards before the mortar dries. Secure the backer boards using corrosion-resistant screws, then seal in between boards and the outer parts of the flange by applying mortar.
- Set The Tiles
Smear tile adhesive on the backer board, then set the tiles, ensuring they fill the gap. Wait for the glue to dry up before screwing your cast iron toilet flange to the floor and installing the toilet bowl.
Floor Build up with plywood
Complete the project by doing the following things:
- Cut The Plywood
The floor area will determine the amount of plywood you’ll need and once you do, cut them to suitable sizes. You’ll require sawhorses and a circular saw to carry out this process.
- Measure Distance
Determine the distance between the toilet flange center and the nearest wall, then indicate it on the plywood with a pencil. Next, find the space between the closest adjacent wall to the flange and the toilet flange’s center and write it down on the plywood.
- Measure The Toilet Flange’s Radius
Add 1/2-inch to the radius measurement and indicate it on the plywood. Use a compass to draw the circle, then cut it out with an appropriate woodcutting tool.
- Fit The Plywood To The Toilet Flange
You must ensure the plywood fits snugly on the toilet flange, so adjust accordingly. Once you are satisfied with the positioning, secure the plywood using glue and screw, making sure you do it correctly to avoid squeaking.
Reattach the toilet bowl afterward.
Read Also how to fix Toilet flange below tile
3. Replace The Toilet Flange
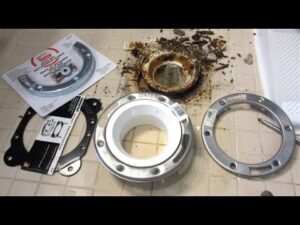
Replacing your cast iron toilet flange with a new one also fixes this problem, provided you install it correctly. You will have to remove the old flange before the new one goes in, and you can decide to maintain the same material (iron cast) or go with PVC when buying the new flange.
Before removing the old toilet flange:
- Switch off the water supply (it could be the toilet line or main valve).
- Disconnect the supply line delivering water into the toilet tank.
- Flush out any water left in the tank.
- Protect your bathroom floor by laying down old rags or newspapers to place the toilet once you remove it.
- Loosen the nuts attaching the toilet to your bathroom floor using a wrench, and don’t lose the nuts since you will need them to reattach the toilet.
- Remember that porcelain is delicate, so lift the toilet slowly.
- If there is wax around the toilet flange, remove it with a putty knife.
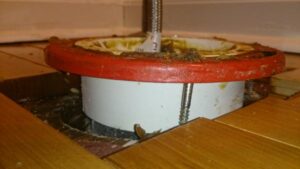
How To Remove A Cast Iron Toilet Flange
Follow the procedure below to remove your cast iron toilet flange.
- It’s possible to lift off the toilet flange if it’s loosened already, so confirm this with a pry bar.
- Break it off if it’s still tightly attached by setting a cold chisel on the flange’s outer edge and hitting it using a hammer. However, avoid hitting near the flange’s inner edge since you could damage the waste pipe.
- Use a pry bar to push the toilet flange upward. If it’s not loose enough to come out, pry it from different flange sections until it comes out.
During installation, make sure you fix the closet flange at the right height, secure the flange bolts, use the correct wax ring size, level your toilet, and caulk the toilet base.
Read Also How to raise toilet flange 2 inches
Conclusion: Cast Iron Toilet Flange Too High
Never install your toilet on a toilet flange that is too high because that will cause leaks and make your toilet wobbly. Therefore, fix your high cast iron toilet flange using the provided methods, ensuring you work carefully to avoid damaging your drain pipes or your bathroom floor.
Read also How many toilets on 3 inch drain