
Like any other bathroom fixture, proper installation is paramount for efficient functionality. This is why you should hire a professional plumber to do the job if you don’t have the necessary skill to do a DIY because you wouldn’t want your tub spout not to flush with the wall.
You can fill the gap between tub spout and wall by caulking the space if the gap is less than 1/2 inches, if it is bigger than t1/2 an inch you will have to use a trim place or shorten the nipple to make the spout flush with wall.
Fortunately, you can solve this issue easily, as you will learn in this post, and have a well-positioned bathtub flange, but first lets find out why your spout is not flush with the wall.
Why Is Your Tub Spout Not Flush With Wall?
Your bathtub spout may not be flush with the wall because you picked the wrong spout type. However, it can happen even after choosing the right one, but luckily you can easily fix the problem.
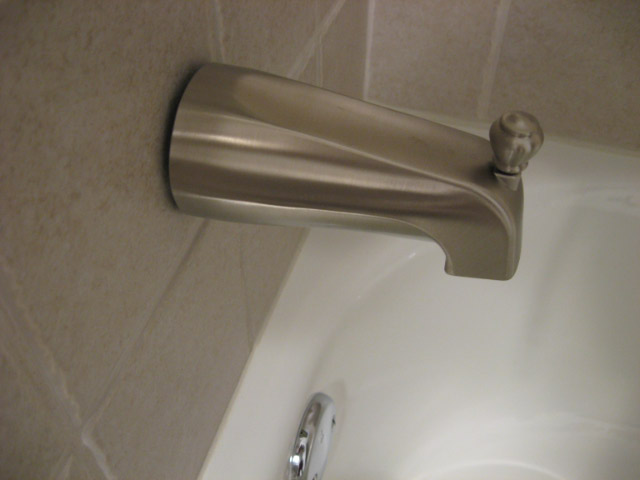
Most spouts have screw threads intended for the pipe nipple extending from the wall close to the front. However, the threads are close to the back in some spouts, so they will not fit the nipple meant for the first spout design.
Your spout’s nipple is too long and should be replaced or cut if it has threads close to the front. The same is true for a slip-on spout.
See also What is the standard tub spout pipe length
How Do You Flush A Tub Spout
As mentioned, the tub spout needs to be flush with the wall, so if there’s space between the wall and the spout’s back, you need to fill it. You can do this through the following ways:
1. Shorten The Nipple
Once you determine the nipple is too long, you can shorten it to bring the tub spout flush with the wall.
a) Smooth Nipple Is Too Long
A slip-on spout joins the unthreaded copper pipe length and is typically soldered to the elbow behind the bathroom wall; therefore, it’s challenging to replace. If it’s too long, cut it instead of replacing it.
Cut it with a tubing cutter, not a hacksaw, to get a smooth edge to slip into the slip connector inside easily.
b) Threaded Nipple Is Too Long
A spout that has a threaded connector close to the front needs a brass or galvanized steel nipple of about 2” to 3” long. The spout will not sit flush if it is too long.
You can tighten the spout an additional turn or two; however, it’s challenging and risky as you could damage the nipple or a spout’s threads. Alternatively, detach the nipple and swap it with a shorter one.
The lengths of pipe nipples vary by half an inch, so you can replace a 3-inch nipple with a 2 ½ inch nipple if it is too long. Do this by unscrewing the nipple using a nipple extractor then replacing it with a new shorter one.
Before you screw in the new nipple, wrap a plumbing tape around the threads.
2. Use A Trim Plate
You can install a trim plate behind the spout if the gap is more than 1/2 an inch. You can find these plates at a building supply store.
The spout opening is typically offset by 1/2” or more from your bathroom wall; hence it may fill up the gap. However, caulking will be necessary if you are dealing with a broader opening.
Read also How to fix tub spout that is too short
3. Caulk It
The best way to fill a gap of half an inch or less after tightening the spout is using silicone caulk. Caulking eliminates the space between the wall and the spout, thus protecting your framing from water damage.
Here’s how to neatly fill the gap between the wall and tub spout using caulk.
- Slide the flange over the nipple stubbing, then fix the tub spout. If the flange is a portion of the spout in your faucet model, just screw on the spout.
- Tighten the tub spout with your hand the best you can, then tighten it further using a strap wrench. You can also tighten it by putting a screwdriver into its mouth then letting the handle be a lever.
- Position the spout and the flange as close together as possible. Squeeze the caulking gun trigger till you see the caulk on the tip, then use a rag to wipe it down and place the nozzle of the tube at the spot where the wall meets the tub spout.
- Squeeze the caulking gun trigger and move it around the spout’s end, making sure every spot has caulk. You can spot in between applications, but ensure the next bead touches the existing one.
- Spread and flatten the caulk by sliding a wet finger around the caulk bead. This will help generate a cleaner, tighter seal and ensure every area has caulk, including where you stopped and started.
- Remove caulk from your hands using a rag.
- The caulk should dry for a minimum of 24 hours before making use of the tub spout.
To accomplish this project, you will need the following:
- Nail
- Caulking gun
- Razor or utility knife
- Silicone caulk
- Blech
- Rag
If the wall was caulked before and there’s some remaining caulk, you must remove it because you will not form a watertight seal should you apply new caulk over an old layer. Clean the spout and wall with a mixture of warm water and bleach at a 3:1 ratio and a rag after removing the old caulk.
Note that caulk comes in different colors, so it’s up to you to pick what will suit you best. However, it’s better to go with white since it matches most bathrooms, but you can also find another matching colour if you prefer a different shade.
FAQs on Tub Spout Not Flush with Wall
-
Should I caulk around tub spout?
It is advisable to caulk around bathtub spout to avoid any water damage that may occur, the process is simple and inexpensive but effective in making a watertight seal.
-
How tight should tub spout be?
For a thread style spout, apply thread sealant on the pipe threads and some amount of caulk at the back of the spout. Then slide the spout to the pipe and tighten by hand until the spout is flush with the wall and aligns with the tub below.
See also White or clear caulk around toilet?
Final Remarks: How Do You Flush a Tub Spout
If you are doing a remodel and realised that the tub spout is not flush with the wall not to worry. You can easily fill in the gap using caulk if it is less than 1/2 inch gap or get a trim place if the gap is larger than 1/2 inch.
Ensuring your tub spout is flush with the wall is practical and aesthetically appealing, so it’s something you must endeavour to achieve when remodelling your bathroom.
If the tub spout flush is not with the wall it prevents water from dripping onto the subfloor and behind the wall.
See also Best bath mat no mildew